
Hello!!! I hope this post finds you well and safe. So many things going on here in the US.
I started with a #8 Mixed Media Heavystock tag. My order of Crackling Campfire had just come in the mail I wanted to make a blend which I did also using Candied Apple and Carved Pumpkin. Splatters of water added texture.

Then what to do... I took inspiration from this month's A Vintage Journey Challenge which is Cogs, Gears and Texture. I misted the back of the tag with water and then embossed it with the Sizzix, Tim Holtz 3D Embossing Folder running it through my Vagabond 3 times (3D - 3 Times as Tim says) to give it a fabulous, dimensional design.

To really bring out the design I added Ground Espresso using a Mini Ink Blending Tool with a light touch going over and over to catch all the texture. I painted the edge of a #8 Etcetera tag with Black Soot Distress Paint and then glued the tag to it with Distress Collage Medium.

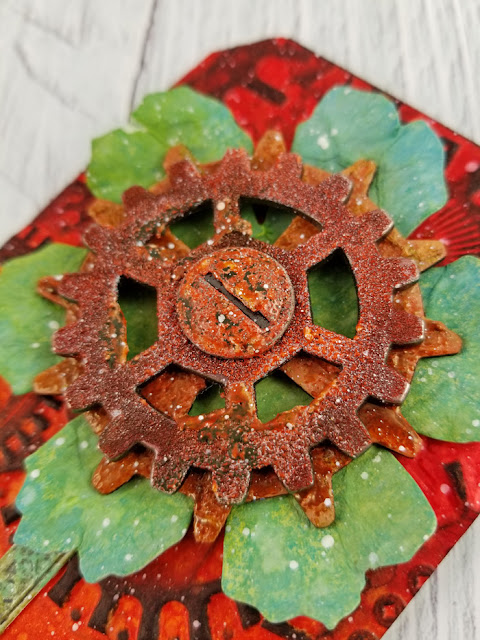
I neglected to take any process pics of the gears or flower. The top gear is from the Idea-ology Gadget Gears pack. The bottom gear is chipboard die cut with the Gadget Gears Bigz Die. The large screw head is from the Idea-ology Machinery Heads pack. I used a variety of product to give them that old, rusty look - Grit Paste, Distress Paint, Distress Embossing Glaze, Distress Crayon.
The flower is Mixed Media Heavystock paper die cut with the Tattered Florals Bigz die. Color was added with Distress sprays and inks and the flower crumpled while still damp.
The gears were layered with foam mounting tape and a bit of Distress Collage Medium to be sure everything stayed stuck. The screw head was glued on with Collage Medium and the whole stack glued to the tag with Collage Medium.
For the stem I die cut Heavystock with the 3D Lattice Trim die, inked the narrower piece with the Distress Embossing Dabber, sprinkled Distress Embossing Glaze, and melted it.
Hickory Smoke crayon was added moving it around first with a water brush, drying, and then adding more and rubbing it with my finger.
Everything was splattered with Distress Paint Picket Fence. Small talk stickers were chosen, edged with Crackling Campfire, spritzed with water to mottle the ink, and glued to the tag. A bit of Distress Paint was added tot he bottom edge of the tag using my finger, dried, and Distress Crayon rubbed on.
This was a fun tag to make!!! I hope you like it. My daughter will probably try to steal it :-)
I pray your week goes well.
Hugs, Wanda


